
Unveiling the Cosmos: A Guide to Galaxy Acrylic Painting
The allure of the cosmos has captivated humanity for millennia. From ancient stargazers to modern-day astrophysicists, the vast expanse of space continues to inspire awe and wonder. It’s no surprise, then, that artists have long sought to capture the ethereal beauty of galaxies on canvas. Among the various mediums available, galaxy acrylic painting stands out as a particularly accessible and rewarding technique. This guide delves into the world of galaxy acrylic painting, offering a comprehensive overview for beginners and seasoned artists alike.
Why Choose Acrylics for Galaxy Painting?
Acrylic paints possess several qualities that make them ideal for creating stunning galaxy artwork. Their fast-drying nature allows for layering and blending without excessive waiting periods. This is crucial when building up the complex textures and gradients characteristic of nebulae and star clusters. Furthermore, acrylics are highly versatile and can be used on a variety of surfaces, including canvas, wood panels, and even paper. The opacity of acrylics also provides excellent coverage, enabling artists to create vibrant and luminous effects. The affordability and accessibility of acrylics make galaxy acrylic painting a fantastic entry point for aspiring artists.
Essential Materials for Your Cosmic Journey
Before embarking on your galaxy acrylic painting adventure, it’s essential to gather the necessary materials. Here’s a checklist to get you started:
- Acrylic Paints: Opt for a range of colors, including black, white, blues (such as ultramarine and phthalo blue), purples (like dioxazine purple), pinks, and potentially some iridescent or metallic paints for added sparkle.
- Canvas or Painting Surface: Choose a canvas size that suits your preference. Stretched canvas is a popular choice, but wood panels or acrylic paper can also work well.
- Brushes: A selection of brushes in various sizes and shapes is recommended. Round brushes are great for details, while flat brushes are useful for blending and creating broad strokes. Consider a fan brush for creating star effects.
- Palette: A palette is essential for mixing your paints. A disposable palette or a wet palette (which keeps your paints moist for longer) are both good options.
- Water Container: Keep a container of clean water handy for rinsing your brushes.
- Paper Towels or Rags: These are essential for wiping your brushes and cleaning up spills.
- Palette Knife or Spatula: Useful for applying paint in thick layers or creating texture.
- Spray Bottle with Water: For keeping the acrylics moist on the canvas and aiding in blending.
- Optional: Glitter, glow-in-the-dark paint, stencils (for planets or other celestial objects).
Step-by-Step Guide to Galaxy Acrylic Painting
Now, let’s dive into the process of creating your own stunning galaxy acrylic painting.
Preparing Your Canvas
Begin by priming your canvas with a layer of gesso. This will create a smooth surface for your paint to adhere to and prevent the canvas from absorbing too much paint. Allow the gesso to dry completely before proceeding.
Creating the Background
Start with a base coat of black acrylic paint. Apply an even layer to the entire canvas. This will serve as the backdrop for your galaxy. Let it dry completely.
Introducing Color and Nebulae
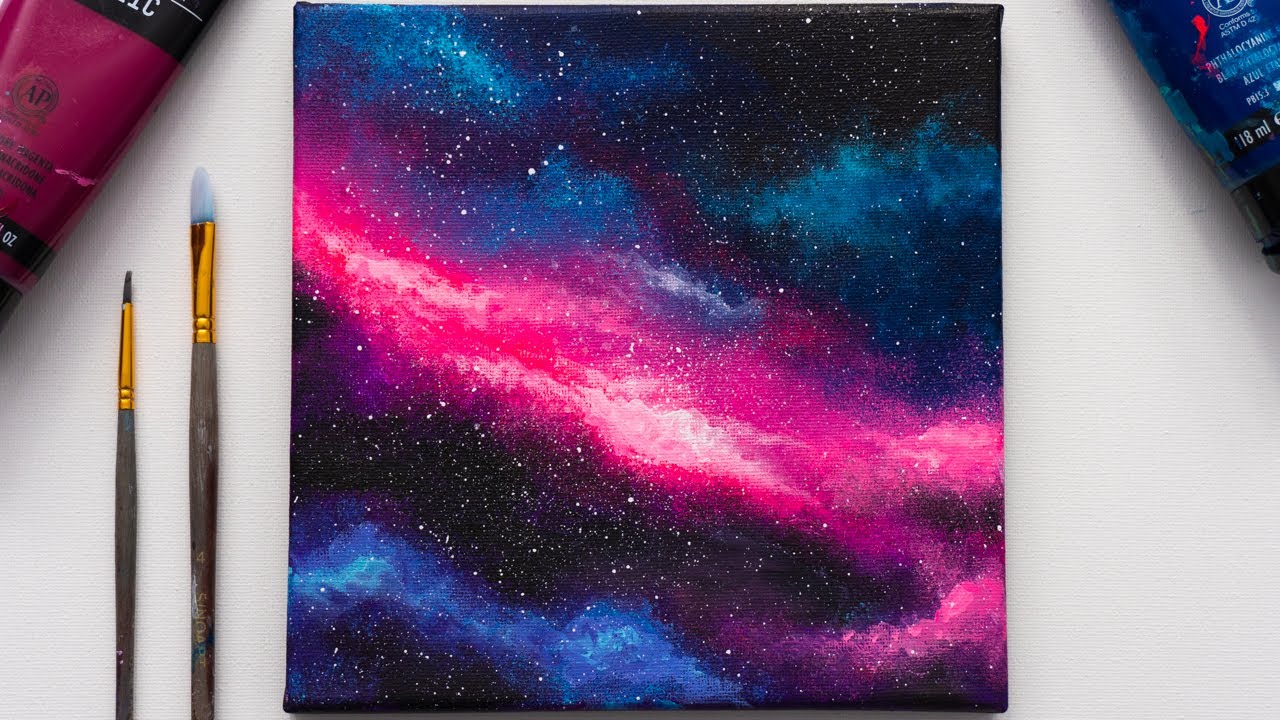
This is where the magic begins! Using a damp brush or a sponge, begin applying colors like blues, purples, and pinks to the canvas. Blend the colors together to create soft, ethereal gradients. Use a spray bottle with water to keep the acrylics wet and facilitate blending. The goal is to create a sense of depth and dimension, mimicking the swirling patterns of nebulae. Don’t be afraid to experiment with different color combinations and blending techniques. Adding white acrylic paint in small amounts can create highlights and further enhance the luminosity of the nebulae. Consider using a dry brush technique for a textured look.
Adding Stars
There are several ways to create stars in your galaxy acrylic painting. One popular method is to use a fan brush. Dip the tips of the bristles in white acrylic paint and then flick the brush towards the canvas. This will create a spray of tiny dots resembling stars. Another technique is to use a toothbrush. Dip the toothbrush in white paint and then run your finger along the bristles to create a splatter effect. For larger, more prominent stars, you can use a small round brush to paint individual dots. Vary the size and brightness of the stars to create a more realistic effect. You can also use a toothpick or the end of a paintbrush to create tiny, precise stars.
Adding Depth and Dimension
To further enhance the depth and dimension of your galaxy acrylic painting, consider adding layers of translucent colors. Glazes, which are thin, transparent layers of paint, can be used to create subtle shifts in color and value. You can also use a palette knife to create texture and add highlights. Experiment with different techniques to find what works best for you.
Finishing Touches
Once you’re satisfied with the overall look of your galaxy acrylic painting, allow it to dry completely. You can then add a layer of varnish to protect the painting and enhance its colors. Choose a varnish that is appropriate for acrylic paints. A gloss varnish will create a shiny finish, while a matte varnish will create a more subdued look.
Tips and Tricks for Stunning Galaxy Art
- Embrace Experimentation: Don’t be afraid to try new techniques and color combinations. The beauty of galaxy acrylic painting lies in its freedom and creativity.
- Reference Images: Look at photos of real galaxies and nebulae for inspiration. This will help you understand the colors, shapes, and textures that are characteristic of these celestial objects.
- Layering is Key: Building up your painting in layers will create depth and dimension.
- Blending is Essential: Smooth blending is crucial for creating the soft, ethereal look of nebulae.
- Don’t Overdo It: It’s easy to get carried away with adding stars. Remember that less is often more.
- Practice Makes Perfect: The more you practice, the better you’ll become at galaxy acrylic painting.
Advanced Techniques for Galaxy Acrylic Painting
For artists looking to take their galaxy acrylic painting skills to the next level, consider exploring these advanced techniques:
Pouring Acrylics
Acrylic pouring involves mixing acrylic paints with a pouring medium to create fluid, flowing effects. This technique can be used to create unique and abstract galaxy paintings. [See also: Acrylic Pouring Techniques for Beginners]
Resin Art
Adding a layer of resin to your galaxy acrylic painting can create a glossy, glass-like finish that enhances the colors and adds depth. [See also: How to Use Resin in Art]
Mixed Media
Experiment with incorporating other materials into your galaxy acrylic painting, such as glitter, texture paste, or even found objects. This can add visual interest and create a more unique and personal artwork. [See also: Exploring Mixed Media Art Techniques]
Galaxy Acrylic Painting: A Rewarding Artistic Pursuit
Galaxy acrylic painting offers a rewarding and accessible way to explore your creativity and capture the beauty of the cosmos. With a little practice and experimentation, you can create stunning works of art that will inspire awe and wonder. So, gather your materials, unleash your imagination, and embark on your own cosmic journey through the world of galaxy acrylic painting. The vibrant colors and the captivating depth that can be achieved with acrylics make it a perfect medium to express the vastness of space. Remember to keep exploring different techniques and styles. Each painting is a new opportunity to learn and refine your skills. So, grab your brushes and let the universe be your guide in your galaxy acrylic painting endeavors!
The accessibility of acrylics, combined with the boundless inspiration of the cosmos, makes galaxy acrylic painting a truly captivating art form. Whether you’re a beginner or an experienced artist, there’s always something new to discover in the world of galaxy acrylic painting.
