The Ultimate Guide to Removing Jamberry Nail Wraps from Acrylic Nails Safely
Navigating the world of nail enhancements can be tricky, especially when combining different products like Jamberry nail wraps and acrylic nails. While both offer unique aesthetic benefits, removing Jamberry from acrylic nails requires a delicate approach to avoid damaging the underlying acrylic and your natural nails. This comprehensive guide provides safe and effective methods for removing Jamberry from acrylic nails, ensuring your nails remain healthy and strong.
Understanding the Challenge: Jamberry Wraps and Acrylic Nails
Before diving into the removal process, it’s crucial to understand why removing Jamberry from acrylic nails presents a unique challenge. Jamberry nail wraps adhere strongly to the nail surface, and acrylic nails, while durable, can be susceptible to damage from harsh chemicals or aggressive removal techniques. Therefore, a gentle and patient approach is key.
The Composition of Jamberry Nail Wraps
Jamberry nail wraps are made from a heat-activated vinyl material. This material adheres to the nail using a strong adhesive. While designed to be long-lasting, this strong adhesive can pose a problem when applied over acrylics, making removal more difficult without proper technique.
The Nature of Acrylic Nails
Acrylic nails are created by combining a liquid monomer and a powder polymer, forming a hard, protective layer over the natural nail. While durable, acrylics can be weakened by acetone and other solvents if exposed for prolonged periods. This is a primary concern when removing Jamberry from acrylic nails.
Safe Methods for Removing Jamberry from Acrylic Nails
Several methods can safely remove Jamberry from acrylic nails. The key is to use gentle techniques and avoid harsh chemicals that could damage the acrylic. Here are some proven methods:
The Warm Water Soak Method
This method is the gentlest and often the most effective for initial loosening of the Jamberry wrap. Here’s how to do it:
- Fill a bowl with warm (not hot) water.
- Submerge your nails in the water for 5-10 minutes. This will help to soften the adhesive on the Jamberry from acrylic nails.
- Gently try to peel back the edge of the Jamberry wrap. If it doesn’t budge easily, soak for a few more minutes.
- Once you can lift an edge, use a cuticle pusher or orange stick to carefully work under the wrap, gently separating it from the acrylic.
- Avoid forcing the wrap off, as this can damage the acrylic underneath. If it’s still sticking, re-soak and try again.
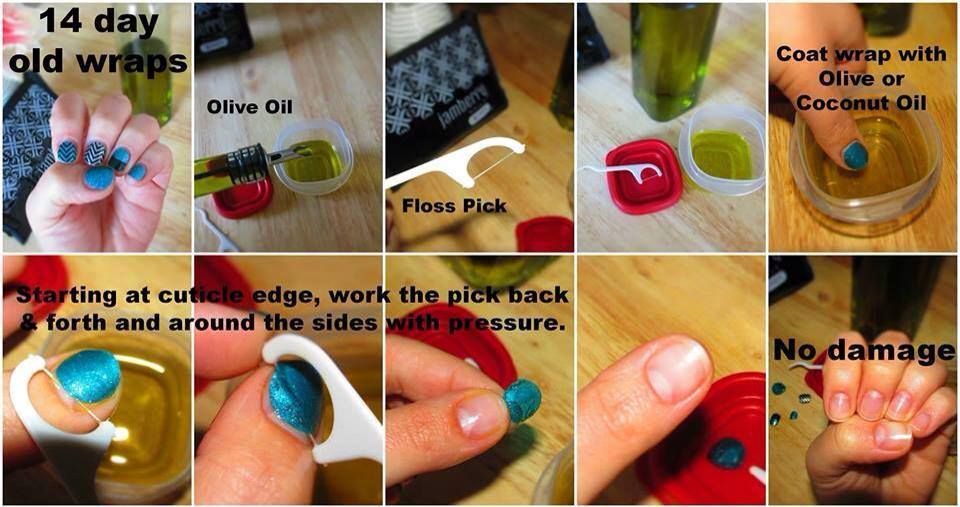
The Oil Application Method
Using oil can help to dissolve the adhesive without damaging the acrylic. Here’s how:
- Apply cuticle oil, olive oil, or coconut oil around the edges of the Jamberry from acrylic nails.
- Let the oil sit for 5-10 minutes to penetrate the adhesive.
- Use a cuticle pusher or orange stick to gently lift the edges of the wrap.
- Continue applying oil as you work to loosen the wrap.
- Wipe away excess oil and repeat if necessary.
The Hair Dryer Method
Applying heat from a hair dryer can soften the adhesive, making it easier to peel off the wrap. Be cautious not to overheat the acrylic, as this could cause damage.
- Set your hair dryer to a low heat setting.
- Hold the hair dryer a few inches away from your nails and apply heat for a few seconds at a time.
- Gently try to lift the edge of the Jamberry from acrylic nails.
- Use a cuticle pusher or orange stick to carefully work under the wrap as the heat softens the adhesive.
- Avoid prolonged heat exposure to prevent damage to the acrylic.
What to Avoid When Removing Jamberry from Acrylic Nails
Certain methods and products should be avoided to prevent damage to your acrylic nails and natural nails. Here’s what to steer clear of:
Acetone
While acetone is effective for removing many types of nail enhancements, it can weaken and dissolve acrylic nails. Prolonged exposure to acetone can lead to brittle, damaged acrylics. Therefore, avoid using pure acetone or acetone-based nail polish removers when removing Jamberry from acrylic nails.
Aggressive Peeling or Scraping
Forcing the Jamberry from acrylic nails can lift or damage the acrylic layer. Always use gentle techniques and patience to avoid causing harm to your nails.
Sharp Tools
Avoid using sharp metal tools that can scratch or gouge the acrylic surface. Opt for cuticle pushers or orange sticks instead.
Post-Removal Care for Acrylic Nails
After successfully removing Jamberry from acrylic nails, it’s essential to provide proper care to maintain the health and appearance of your acrylics. Here are some tips:
Moisturize Your Nails and Cuticles
Apply cuticle oil or a moisturizing cream to hydrate the acrylic and the surrounding skin. This helps prevent dryness and cracking.
Gently Buff the Acrylic Surface
Use a fine-grit buffer to smooth out any rough edges or imperfections on the acrylic surface. Be gentle and avoid over-buffing, as this can thin the acrylic.
Apply a Top Coat
Seal the acrylic with a clear top coat to protect it from damage and maintain its shine. Reapply the top coat every few days to prolong the life of your acrylics.
Consider a Professional Touch-Up
If you notice any significant damage or lifting of the acrylic, consider visiting a professional nail technician for a touch-up or repair. They can address any issues and ensure your acrylics remain in good condition.
Preventative Measures for Future Applications
To minimize the difficulty of removing Jamberry from acrylic nails in the future, consider these preventative measures:
Apply a Barrier Coat
Before applying Jamberry wraps, apply a thin layer of clear nail polish or a peel-off base coat over the acrylic. This creates a barrier between the wrap and the acrylic, making removal easier.
Avoid Overlapping onto the Skin
Ensure the Jamberry wraps are applied only to the acrylic surface and not overlapping onto the surrounding skin. This reduces the risk of the wrap adhering too tightly and causing damage during removal.
Regular Maintenance
Keep your acrylic nails well-maintained with regular fills and touch-ups. This helps prevent lifting and damage, making the removal process smoother.
Troubleshooting Common Issues
Even with the best techniques, you may encounter some challenges when removing Jamberry from acrylic nails. Here are some troubleshooting tips:
Wrap Won’t Budge
If the wrap is stubbornly stuck, try combining methods. For example, soak in warm water, apply oil, and then use the hair dryer on a low setting. Patience is key.
Acrylic is Lifting
If you notice the acrylic lifting while removing the wrap, stop immediately. Apply cuticle oil and gently massage the area. If the lifting persists, seek professional assistance.
Sticky Residue
After removing the wrap, you may be left with sticky residue. Use a lint-free wipe soaked in a small amount of rubbing alcohol to gently remove the residue. Follow with cuticle oil to rehydrate the nails.
Conclusion: Gentle Care is Key
Removing Jamberry from acrylic nails requires a delicate and patient approach. By using gentle methods, avoiding harsh chemicals, and providing proper post-removal care, you can maintain the health and beauty of your acrylic nails. Remember to moisturize, buff, and protect your nails to keep them looking their best. With these tips, you can confidently enjoy both Jamberry nail wraps and acrylic nails without compromising the integrity of your nail enhancements. Always prioritize the health of your natural and acrylic nails, and when in doubt, consult a professional nail technician. The key to successfully removing Jamberry from acrylic nails lies in gentle, consistent effort and a commitment to nail health. [See also: How to Maintain Healthy Acrylic Nails] [See also: The Best Cuticle Oils for Nail Health]
