
The Definitive Guide to the Acrylic Nail Process: Everything You Need to Know
Acrylic nails have become a staple in the beauty industry, offering a durable and customizable solution for achieving the perfect manicure. Whether you’re a seasoned nail technician or a curious individual looking to understand the process, this comprehensive guide will walk you through every step of the acrylic nail process. From preparation to application and maintenance, we’ll cover everything you need to know to achieve salon-quality results. Understanding the acrylic nail process is crucial for both applying and maintaining beautiful and long-lasting nails. Let’s dive into the world of acrylic nails!
What are Acrylic Nails?
Acrylic nails are artificial nail enhancements made from a combination of a liquid monomer and a powder polymer. When these two components are mixed, they form a pliable substance that can be sculpted onto the natural nail. The mixture hardens over time, creating a strong and durable layer. This layer can then be shaped, filed, and polished to achieve the desired look. The popularity of acrylic nails stems from their durability and versatility.
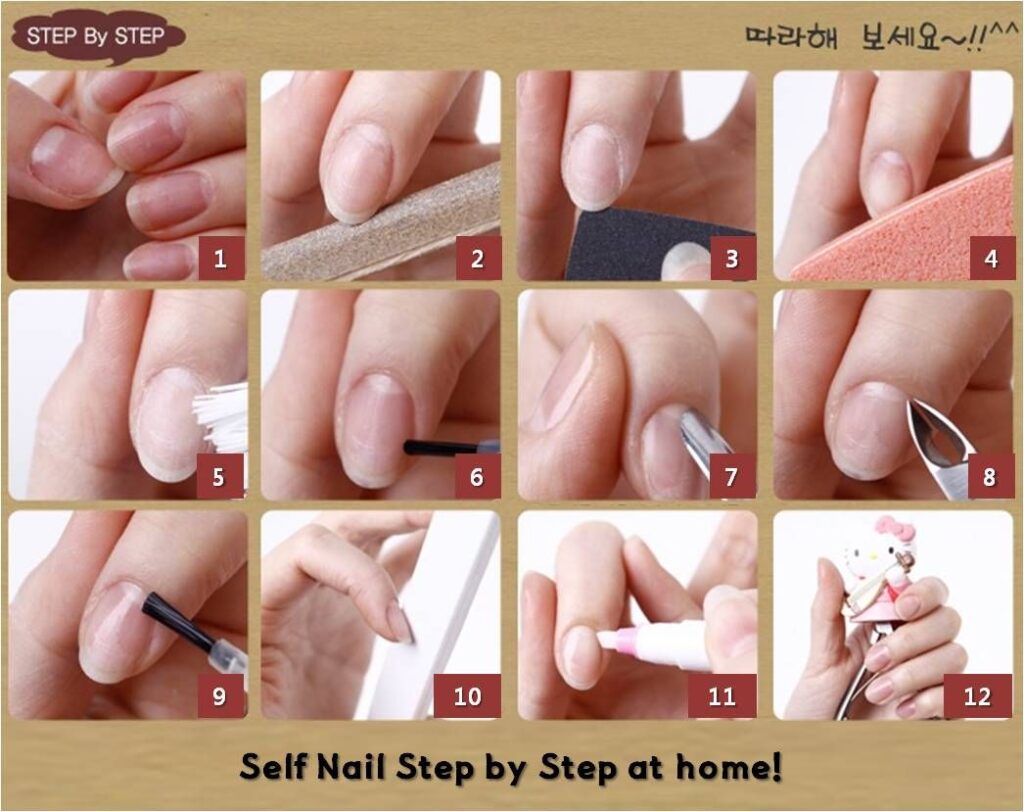
The Acrylic Nail Process: A Step-by-Step Guide
The acrylic nail process involves several key steps. Let’s break it down:
Step 1: Preparation
Proper preparation is essential for a successful acrylic nail process. This step ensures that the acrylic adheres properly and prevents lifting. Here’s what you need to do:
- Cleanse the Nails: Start by washing your hands and thoroughly cleaning your nails with soap and water. Remove any existing nail polish or residue.
- Push Back Cuticles: Gently push back your cuticles with a cuticle pusher. This helps to create a clean and even surface for the acrylic application.
- Buff the Nail Surface: Use a nail buffer to gently buff the surface of your natural nails. This creates a slightly rough texture, which helps the acrylic adhere better. Be careful not to over-buff, as this can thin the natural nail.
- Dehydrate the Nails: Apply a nail dehydrator to remove any oils or moisture from the nail surface. This is a crucial step for preventing lifting.
- Apply Primer: Apply a thin layer of nail primer to each nail. Primer helps to further improve adhesion and prevent lifting.
Step 2: Acrylic Application
Now that your nails are properly prepared, it’s time to apply the acrylic. This step requires practice and precision. Here’s how to do it:
- Prepare Your Acrylic Mixture: Pour a small amount of liquid monomer into a dappen dish. Dip your acrylic brush into the monomer, then tap it lightly on a paper towel to remove excess liquid. Dip the brush into the acrylic powder, allowing a small bead to form on the brush.
- Apply the First Bead: Place the first bead of acrylic near the cuticle area, leaving a small gap to avoid contact with the skin. Gently pat and shape the acrylic, blending it seamlessly into the natural nail.
- Apply the Second Bead: Place the second bead of acrylic in the middle of the nail. Again, pat and shape the acrylic, blending it into the first bead.
- Apply the Third Bead: Place the third bead of acrylic at the free edge of the nail. Shape and blend this bead to create the desired length and shape.
- Allow to Harden: Allow the acrylic to harden completely. This usually takes a few minutes. You can tap the acrylic with your brush; if it makes a clicking sound, it’s ready.
Step 3: Shaping and Filing
Once the acrylic has hardened, it’s time to shape and file the nails to achieve the desired look. This step requires patience and attention to detail. Here’s what you need to do:
- Shape the Nails: Use a nail file to shape the nails to your desired shape. Common shapes include square, oval, almond, and stiletto.
- File the Surface: Use a nail file to smooth out any imperfections on the surface of the acrylic. Pay attention to the cuticle area and the free edge.
- Buff the Nails: Use a nail buffer to smooth the surface of the nails further. This will create a smooth and even base for polish.
Step 4: Finishing Touches
The final step in the acrylic nail process involves adding the finishing touches to create a polished and professional look. Here’s what you need to do:
- Clean the Nails: Use a nail brush to remove any dust or debris from the nails.
- Apply Polish: Apply a base coat, followed by two coats of your desired nail polish color.
- Apply Top Coat: Finish with a top coat to seal the polish and add shine.
- Apply Cuticle Oil: Apply cuticle oil to moisturize the cuticles and surrounding skin.
Tips for a Successful Acrylic Nail Process
Here are some tips to help you achieve the best results with your acrylic nails:
- Practice Makes Perfect: The acrylic nail process takes practice. Don’t be discouraged if your first attempt isn’t perfect. Keep practicing, and you’ll improve over time.
- Use Quality Products: Invest in high-quality acrylic liquid, powder, and other supplies. This will make a big difference in the final result.
- Work in a Well-Ventilated Area: Acrylic fumes can be strong, so make sure to work in a well-ventilated area.
- Clean Your Brushes Regularly: Clean your acrylic brush after each use to prevent it from hardening. Use a brush cleaner specifically designed for acrylic brushes.
- Don’t Over-File: Be careful not to over-file your natural nails, as this can weaken them.
Maintaining Your Acrylic Nails
Proper maintenance is essential for keeping your acrylic nails looking their best. Here are some tips for maintaining your acrylic nails:
- Schedule Regular Fill-Ins: As your natural nails grow, you’ll need to schedule regular fill-ins to fill the gap between the acrylic and your cuticle. This is typically done every 2-3 weeks.
- Avoid Harsh Chemicals: Avoid exposing your acrylic nails to harsh chemicals, such as cleaning products. Wear gloves when doing housework or gardening.
- Moisturize Regularly: Keep your hands and cuticles moisturized to prevent dryness and cracking.
- Don’t Pick or Bite Your Nails: Picking or biting your acrylic nails can damage them and your natural nails.
- Be Gentle: Treat your acrylic nails with care. Avoid using them as tools to open things or scrape surfaces.
Troubleshooting Common Acrylic Nail Problems
Even with careful application and maintenance, you may encounter some common problems with your acrylic nails. Here are some solutions:
- Lifting: Lifting occurs when the acrylic separates from the natural nail. This can be caused by improper preparation, moisture, or oil on the nail surface. To prevent lifting, make sure to properly dehydrate and prime your nails before applying the acrylic.
- Cracking: Cracking can occur if the acrylic is too thin or if it’s exposed to excessive force. To prevent cracking, make sure to apply the acrylic in even layers and avoid using your nails as tools.
- Yellowing: Yellowing can occur if the acrylic is exposed to UV light or certain chemicals. To prevent yellowing, wear gloves when using cleaning products and avoid prolonged exposure to sunlight.
- Bubbles: Bubbles can occur if the acrylic is not mixed properly or if air is trapped during application. To prevent bubbles, make sure to mix the acrylic thoroughly and use a smooth, even application technique.
The Future of Acrylic Nails
The acrylic nail process continues to evolve with new techniques and products emerging regularly. From innovative acrylic powders to advanced application methods, the future of acrylic nails is bright. As technology advances, we can expect to see even more durable, customizable, and long-lasting acrylic nail options available. Stay tuned for the latest trends and innovations in the world of acrylic nails!
Understanding the intricacies of the acrylic nail process empowers both professionals and enthusiasts to achieve stunning results. By following these guidelines and continuously refining your technique, you can master the art of acrylic nails and create beautiful, durable manicures that last. [See also: Gel Nail Application Guide] [See also: Different Nail Shapes and Styles] [See also: The Benefits of Professional Manicures]
