Removing Cassette from Rear Wheel: A Comprehensive Guide for Cyclists
Maintaining your bicycle is crucial for optimal performance and safety. One essential maintenance task is removing the cassette from the rear wheel. Whether you’re replacing worn-out cogs, cleaning components, or upgrading to a different gear ratio, understanding how to safely and effectively remove the cassette is paramount. This guide provides a step-by-step approach, ensuring you can confidently tackle this task. The process of removing cassette from rear wheel is straightforward with the right tools and knowledge.
Why Remove a Cassette?
Several reasons might prompt you to remove the cassette from your rear wheel:
- Replacing Worn Cogs: Over time, the cassette cogs wear down, leading to poor shifting performance and chain skipping. Replacing the cassette restores smooth and efficient gear changes.
- Cleaning: Removing the cassette allows for thorough cleaning of both the cassette and the freehub body, removing dirt, grime, and old lubricant.
- Upgrading: You might want to upgrade to a cassette with a different gear ratio to better suit your riding style or terrain.
- Wheel Maintenance: Accessing the freehub body for cleaning, lubrication, or replacement often requires removing cassette from rear wheel first.
- Bike Transport: Sometimes, to fit a bike in a smaller space for transport, disassembling certain components, including the cassette, may be necessary.
Tools Required
Before you begin, gather the necessary tools:
- Cassette Lockring Tool: This tool engages with the splines on the cassette lockring. The type needed depends on the brand (Shimano/SRAM or Campagnolo).
- Chain Whip: The chain whip holds the cassette cogs in place while you loosen the lockring.
- Adjustable Wrench or Socket Wrench: To turn the cassette lockring tool.
- Gloves (Optional): To keep your hands clean.
Step-by-Step Guide to Removing the Cassette
Preparation
Before removing cassette from rear wheel, ensure your workspace is clean and well-lit. Place the wheel on a stable surface, such as a work stand or the ground. If on the ground, protect the wheel with a cloth or mat.
Securing the Wheel
If using a work stand, ensure the wheel is securely mounted. If on the ground, position the wheel so that you have easy access to the cassette.
Engaging the Chain Whip
Place the chain whip on one of the larger cogs of the cassette. Ensure the chain whip’s handle is positioned so you can apply counter-clockwise force (when viewed from the cassette side).
Inserting the Cassette Lockring Tool
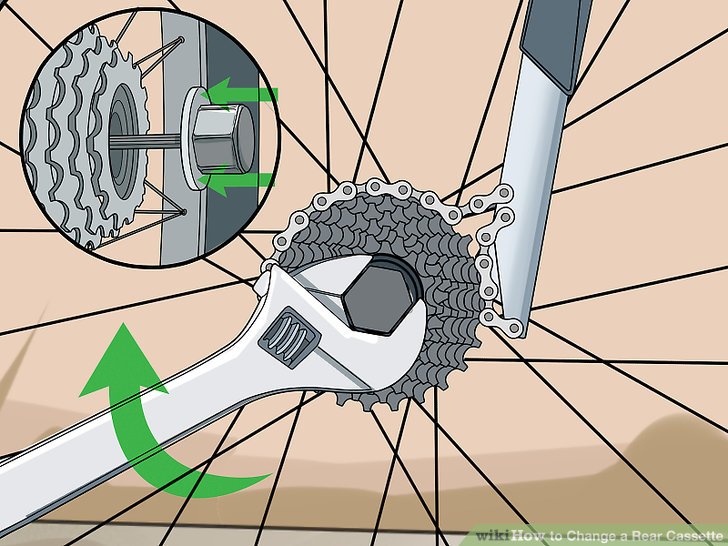
Insert the cassette lockring tool into the lockring. Make sure it is fully engaged and seated properly to avoid damaging the lockring splines. The lockring tool should fit snugly.
Loosening the Lockring
Attach the adjustable wrench or socket wrench to the cassette lockring tool. While holding the chain whip firmly in place (applying counter-clockwise force), use the wrench to turn the lockring tool counter-clockwise. You will need to apply significant force to break the lockring loose.
Important: It’s crucial to hold the chain whip firmly. If the cassette rotates with the lockring tool, the lockring will not loosen. If you are having trouble, double-check that the chain whip is properly engaged and that you are applying sufficient force.
Removing the Lockring
Once the lockring is loose, you can remove the cassette lockring tool and the chain whip. Unscrew the lockring completely by hand. Be careful as the lockring threads can be sharp.
Removing the Cassette Cogs
With the lockring removed, you can now slide the cassette cogs off the freehub body. Note the order and orientation of the cogs and any spacers between them. Some cassettes have individual cogs, while others have cogs grouped together on a carrier. Take pictures as you disassemble if you want to ensure you can reassemble it correctly. This is particularly helpful if you’re new to removing cassette from rear wheel.
Cleaning and Inspection
Cleaning the Cassette Cogs
Clean the cassette cogs with a degreaser and a brush. Remove any dirt, grime, and old lubricant. Pay particular attention to the spaces between the cogs. [See also: Bicycle Cleaning Tips] Thorough cleaning ensures smooth shifting and prolongs the life of your drivetrain.
Cleaning the Freehub Body
Clean the freehub body with a degreaser and a cloth. Remove any dirt, grime, and old lubricant. Inspect the freehub body for any signs of wear or damage. If the freehub body is damaged, it may need to be replaced. A clean freehub body is essential for proper cassette function.
Inspecting the Lockring
Inspect the lockring for any signs of wear or damage. Replace the lockring if it is damaged. A damaged lockring can cause the cassette to come loose during riding.
Reinstalling the Cassette
Lubricating the Freehub Body
Apply a light coat of grease to the freehub body splines. This will prevent the cassette cogs from seizing onto the freehub body. A little grease makes future removing cassette from rear wheel easier.
Reinstalling the Cassette Cogs
Reinstall the cassette cogs onto the freehub body in the correct order and orientation, including any spacers. Ensure each cog is properly seated on the splines.
Reinstalling the Lockring
Thread the lockring onto the freehub body by hand. Tighten the lockring using the cassette lockring tool and the adjustable wrench or socket wrench. Tighten the lockring to the manufacturer’s specified torque (usually around 40 Nm). Using a torque wrench is recommended to avoid overtightening or undertightening the lockring. Proper torque is crucial for safe riding.
Verifying Installation
After reinstalling the cassette, verify that it is properly installed and that all cogs are securely in place. Spin the wheel and check for any unusual noises or movement. Shift through all the gears to ensure smooth and accurate shifting. If you notice any problems, recheck your work and make sure everything is properly aligned and tightened.
Troubleshooting
Lockring Won’t Loosen
If the lockring is difficult to loosen, ensure the chain whip is properly engaged and that you are applying sufficient force. You can also try using a longer wrench for more leverage. If the lockring is still stuck, you may need to apply penetrating oil and let it sit for a few minutes before trying again.
Cassette Cogs Won’t Slide Off
If the cassette cogs are difficult to slide off the freehub body, try gently wiggling them back and forth. You can also use a small screwdriver to carefully pry them off. Be careful not to damage the freehub body or the cogs.
Difficulty Shifting After Reinstallation
If you experience difficulty shifting after reinstalling the cassette, check that the cassette cogs are properly aligned and that the lockring is tightened to the correct torque. Also, check your derailleur alignment and cable tension. You may need to adjust your derailleur to ensure smooth shifting.
Maintenance Tips
- Regular Cleaning: Clean your cassette and freehub body regularly to prevent dirt and grime buildup.
- Proper Lubrication: Lubricate the freehub body splines before reinstalling the cassette.
- Check for Wear: Regularly inspect your cassette cogs and chain for wear. Replace them as needed.
- Use a Torque Wrench: Use a torque wrench when tightening the lockring to ensure proper torque.
Conclusion
Removing cassette from rear wheel is a manageable task with the right tools and knowledge. Following this guide, you can confidently remove, clean, and reinstall your cassette, ensuring optimal performance and longevity of your bicycle’s drivetrain. Regular maintenance and proper installation are key to enjoying smooth and efficient rides. Remember, when in doubt, consult a professional bicycle mechanic.
