
How to Use Web Server for Chrome: A Comprehensive Guide
The Web Server for Chrome is a powerful yet simple tool that transforms your Chrome browser into a local web server. This allows you to host and test web applications, websites, and static content directly from your computer without needing a dedicated web server environment like Apache or Nginx. This guide will walk you through the process of setting up and effectively using the Web Server for Chrome application, covering everything from installation to advanced configuration.
Understanding the Basics
Before diving into the practical steps, let’s understand why you might need a local web server. Web developers often need to test their code in a real-world environment before deploying it to a live server. A local web server simulates this environment, allowing you to identify and fix bugs, test functionalities, and ensure compatibility across different browsers. Web Server for Chrome offers a convenient and lightweight solution for this purpose.
Why Choose Web Server for Chrome?
- Ease of Use: Setting up a traditional web server can be complex, involving configuration files and command-line interfaces. Web Server for Chrome simplifies this process with a user-friendly graphical interface.
- Lightweight: Unlike full-fledged web servers, Web Server for Chrome consumes minimal system resources, making it ideal for development and testing on resource-constrained machines.
- Cross-Platform Compatibility: As a Chrome extension, it works seamlessly on Windows, macOS, and Linux operating systems.
- Cost-Effective: It’s a free extension available on the Chrome Web Store.
Installing Web Server for Chrome
The first step is to install the Web Server for Chrome extension from the Chrome Web Store. Here’s a step-by-step guide:
- Open the Chrome Web Store in your Chrome browser.
- Search for “Web Server for Chrome“.
- Click on the “Add to Chrome” button.
- Confirm the installation by clicking “Add extension” in the pop-up window.
Once installed, you’ll see the Web Server for Chrome icon in your Chrome toolbar. If it doesn’t appear, you might need to pin it manually.
Configuring Web Server for Chrome
After installation, you need to configure the extension to serve your web files. Here’s how:
- Click on the Web Server for Chrome icon in your Chrome toolbar.
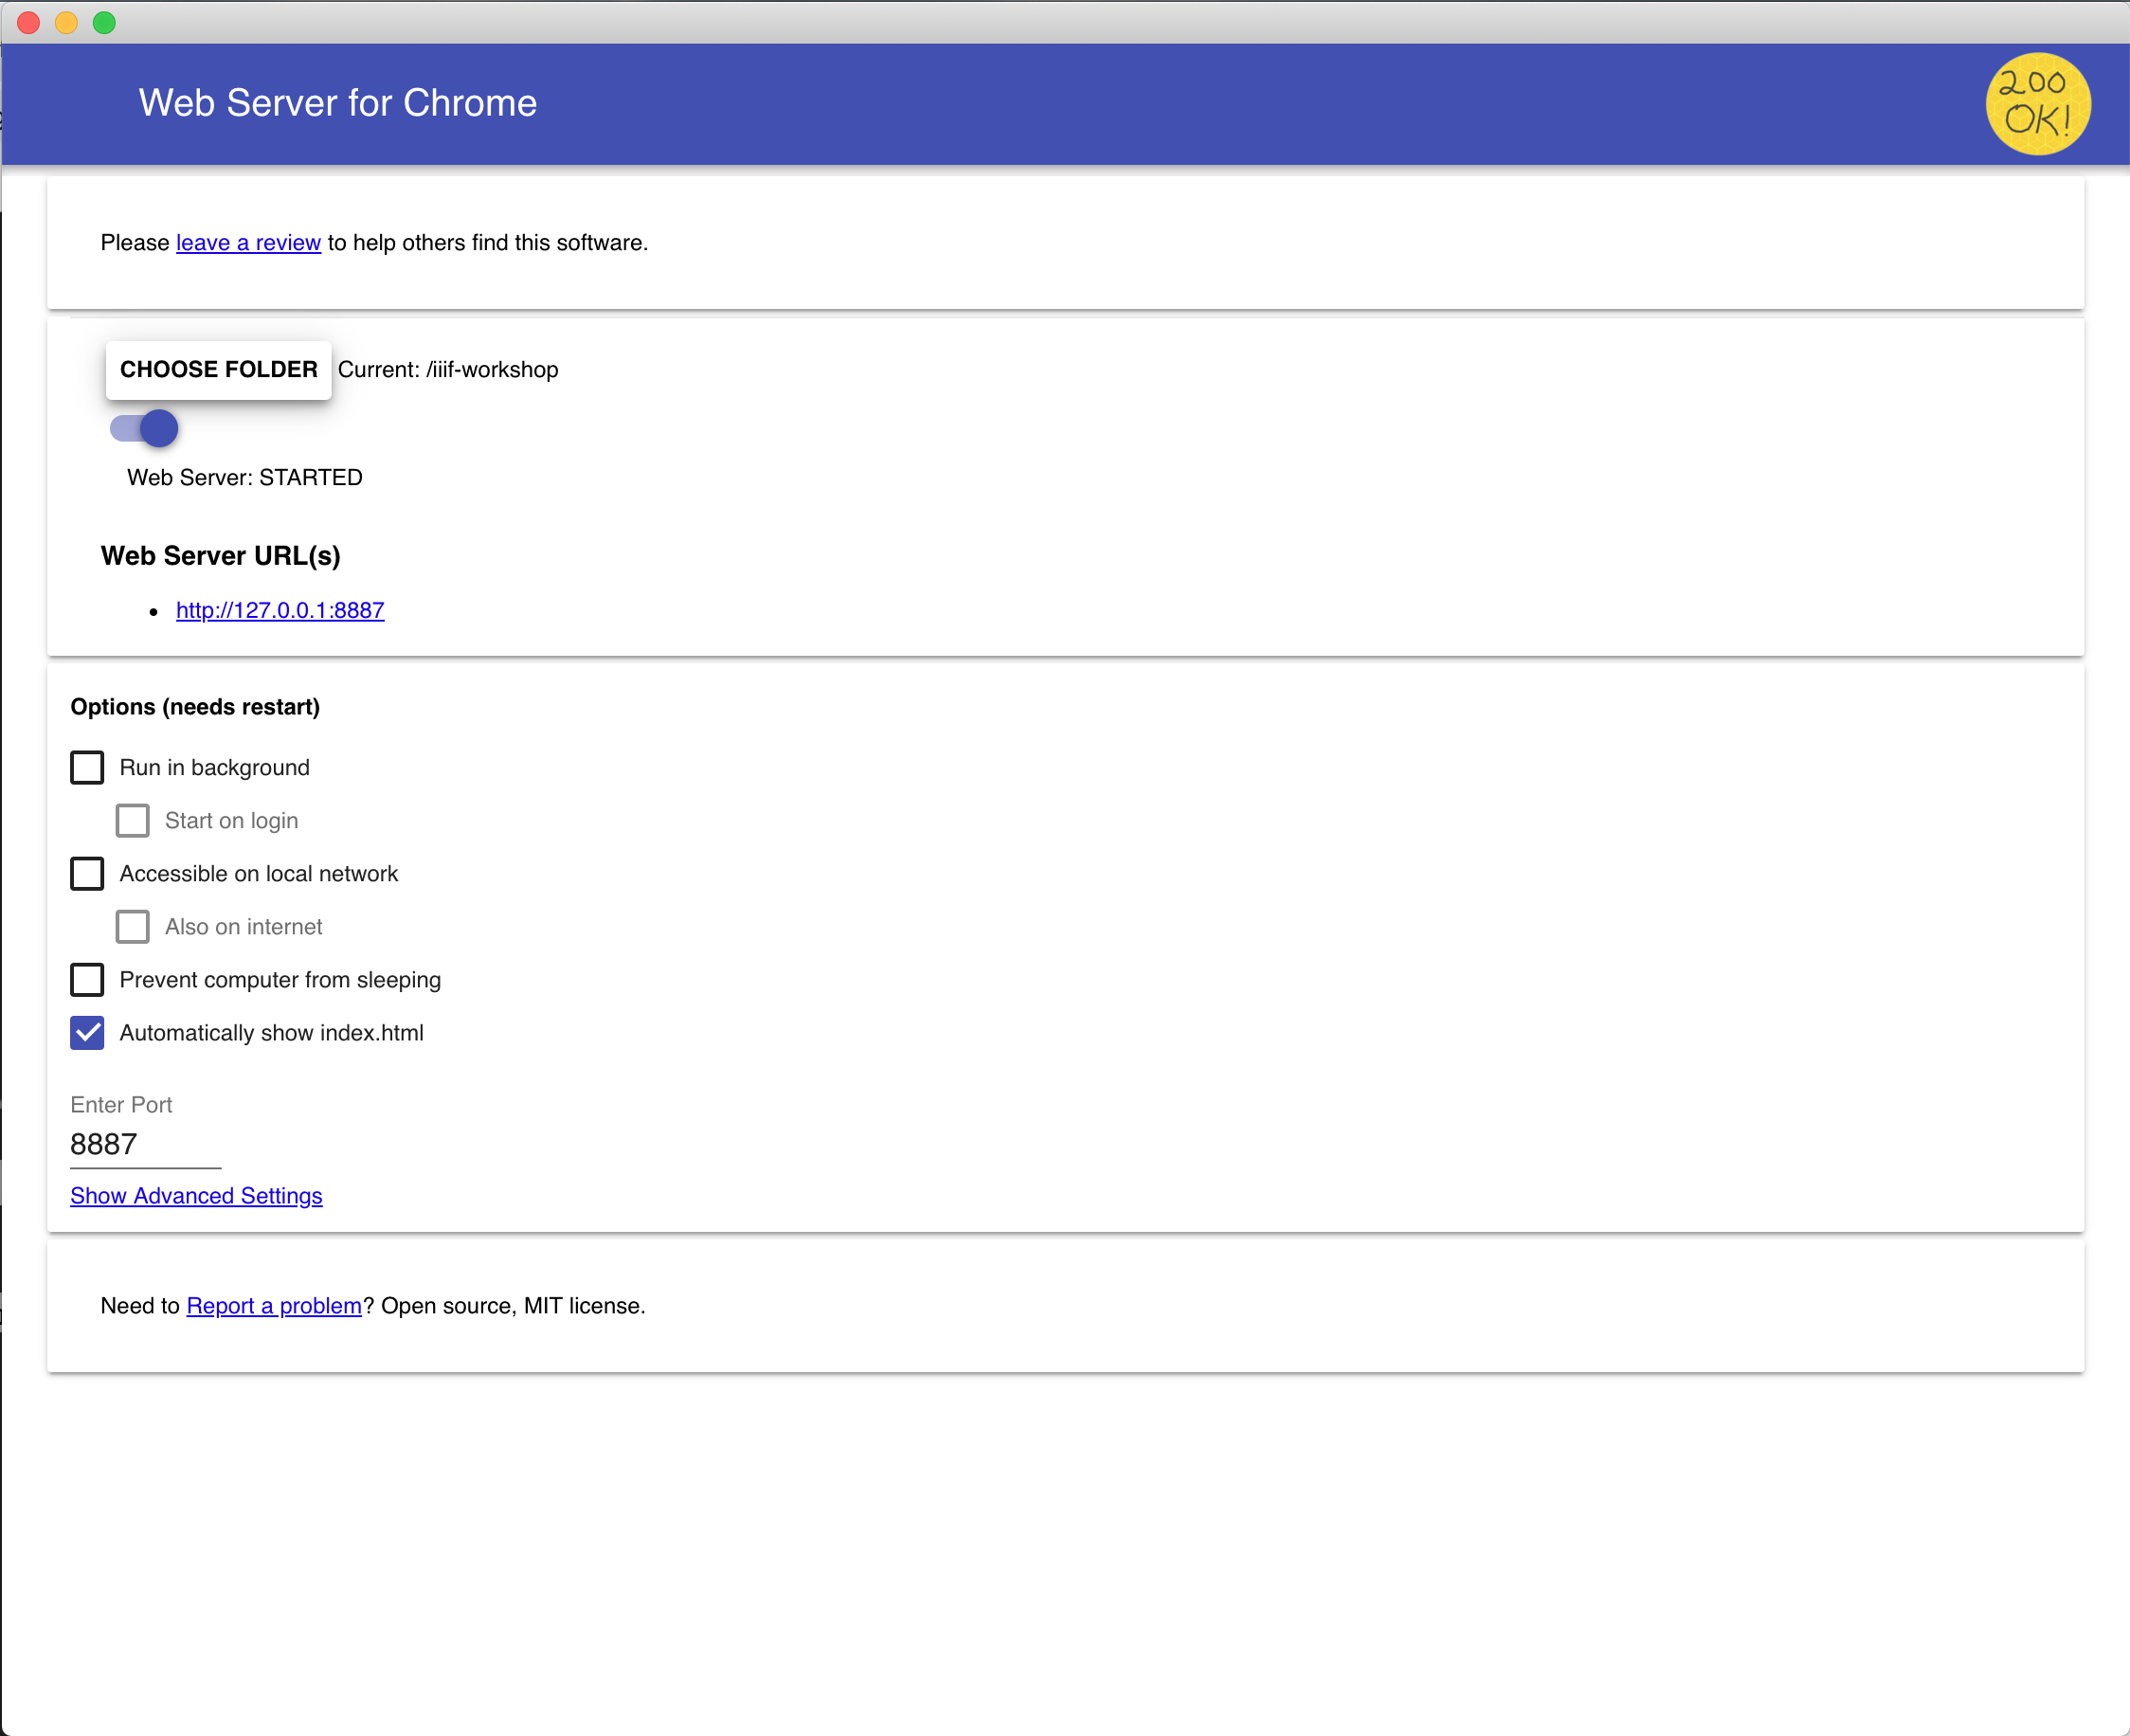
- A configuration window will appear. In the “Choose folder” section, click on the “CHOOSE FOLDER” button.
- Navigate to the directory containing your web files (e.g., HTML, CSS, JavaScript files) and select it.
- The selected directory will now be displayed in the “Web Server URL(s)” section.
- Enable the “Automatically show index.html” option if you want the server to automatically display the index.html file in the selected directory when you access the server URL.
- You can also configure other options such as the port number and cache settings.
The “Web Server URL(s)” section will display the URL you can use to access your web server. It typically looks like http://127.0.0.1:8887 or http://localhost:8887, where 8887 is the default port number. You can change the port number if needed, but ensure it’s not already in use by another application.
Testing Your Web Server
To test your Web Server for Chrome setup, follow these steps:
- Open a new tab in your Chrome browser.
- Enter the URL displayed in the “Web Server URL(s)” section of the Web Server for Chrome configuration window (e.g.,
http://127.0.0.1:8887). - If everything is configured correctly, you should see your website or web application displayed in the browser.
If you encounter any issues, double-check the following:
- Ensure that the correct directory is selected in the “Choose folder” section.
- Verify that the port number is not blocked by your firewall or another application.
- Make sure that your HTML, CSS, and JavaScript files are correctly formatted and located in the selected directory.
Advanced Configuration Options
Web Server for Chrome offers several advanced configuration options to customize your web server environment:
Port Number
The default port number is 8887, but you can change it to any available port. This is useful if you have multiple web servers running simultaneously or if the default port is blocked. To change the port number, simply enter the desired port in the “Port” field in the configuration window. Remember to update the URL in your browser accordingly.
Cache Settings
Web Server for Chrome caches static files (e.g., images, CSS, JavaScript) to improve performance. However, this can sometimes cause issues when you make changes to your files, as the browser might still be displaying the cached version. To disable caching, uncheck the “Cache” option in the configuration window. This will force the browser to always fetch the latest version of your files.
CORS (Cross-Origin Resource Sharing)
CORS is a security feature that restricts web pages from making requests to a different domain than the one that served the web page. If your web application needs to make requests to a different domain, you might need to enable CORS in Web Server for Chrome. To do this, check the “CORS” option in the configuration window. Be aware that enabling CORS can introduce security risks, so only enable it if necessary and understand the implications.
Index.html Auto-Display
As mentioned earlier, the “Automatically show index.html” option automatically displays the index.html file in the selected directory when you access the server URL. This is convenient for simple websites or single-page applications. If you have multiple HTML files in your directory, you might want to disable this option and manually specify the URL of the desired HTML file in your browser.
Troubleshooting Common Issues
Even with its simplicity, you might encounter some issues while using Web Server for Chrome. Here are some common problems and their solutions:
“This site can’t be reached” Error
This error typically indicates that the web server is not running or that the URL is incorrect. Double-check the following:
- Ensure that the Web Server for Chrome extension is enabled and running.
- Verify that the URL in your browser matches the URL displayed in the “Web Server URL(s)” section of the configuration window.
- Check if the port number is blocked by your firewall or another application.
Changes Not Reflecting
If you make changes to your files and they are not reflected in the browser, try the following:
- Disable caching in the Web Server for Chrome configuration window.
- Clear your browser’s cache and cookies.
- Restart the Web Server for Chrome extension.
CORS Errors
If you encounter CORS errors, ensure that the CORS option is enabled in the Web Server for Chrome configuration window. However, be mindful of the security implications and only enable it if necessary.
Use Cases for Web Server for Chrome
Web Server for Chrome is a versatile tool that can be used in various scenarios:
- Web Development: Test and debug your web applications locally before deploying them to a live server.
- Static Website Hosting: Host simple static websites without needing a dedicated web server.
- Educational Purposes: Learn about web server concepts and experiment with web technologies.
- Offline Access: Access web-based content offline by hosting it locally.
- Prototyping: Quickly prototype web applications and test their functionality.
Alternatives to Web Server for Chrome
While Web Server for Chrome is a convenient option, there are other alternatives available:
- XAMPP: A comprehensive web server environment that includes Apache, MySQL, and PHP. It’s more complex to set up but offers more features.
- Node.js with HTTP-Server: A simple command-line web server that can be installed using Node.js and npm.
- Python’s SimpleHTTPServer: A built-in module in Python that allows you to quickly create a web server from the command line.
- MAMP: Similar to XAMPP, but specifically designed for macOS.
The choice of web server depends on your specific needs and technical expertise. Web Server for Chrome is ideal for beginners and those who need a simple and lightweight solution.
Conclusion
Web Server for Chrome provides a straightforward and efficient way to host and test web applications locally. Its ease of use, lightweight nature, and cross-platform compatibility make it an excellent tool for web developers, students, and anyone who needs to quickly set up a web server. By following this guide, you can effectively configure and use Web Server for Chrome to streamline your web development workflow. Remember to always prioritize security and understand the implications of enabling advanced features like CORS. Whether you’re testing a simple HTML page or a complex web application, Web Server for Chrome can be a valuable asset in your toolkit. The simplicity of the Web Server for Chrome makes it an accessible tool for both novice and experienced developers. Its ability to serve content directly from your browser simplifies the development process, allowing you to focus on building great web experiences. Understanding how to use the Web Server for Chrome is a fundamental skill for anyone involved in web development or design. The Web Server for Chrome offers a fast and reliable solution for local web hosting. Consider exploring the full potential of the Web Server for Chrome for all your local web development needs.
[See also: Setting Up a Local Web Development Environment]
[See also: Best Chrome Extensions for Web Developers]
[See also: Troubleshooting Common Web Server Issues]
