Effective and Safe Ways to Take Off Acrylic Nails at Home
Acrylic nails offer a fantastic way to enhance your look, adding length and style to your fingertips. However, the time inevitably comes when you need to remove them. Heading to a salon for removal can be costly and time-consuming. Fortunately, there are several safe and effective ways to take off acrylic nails at home. This article provides a comprehensive guide on how to remove your acrylics without damaging your natural nails.
Understanding the Importance of Safe Removal
Before diving into the methods, it’s crucial to understand why safe removal is paramount. Improper removal can lead to weakened, brittle, and damaged natural nails. Aggressive picking or peeling can strip layers of the nail, making them susceptible to breakage and infection. By following the correct procedures, you can maintain the health and integrity of your natural nails while removing your acrylics.
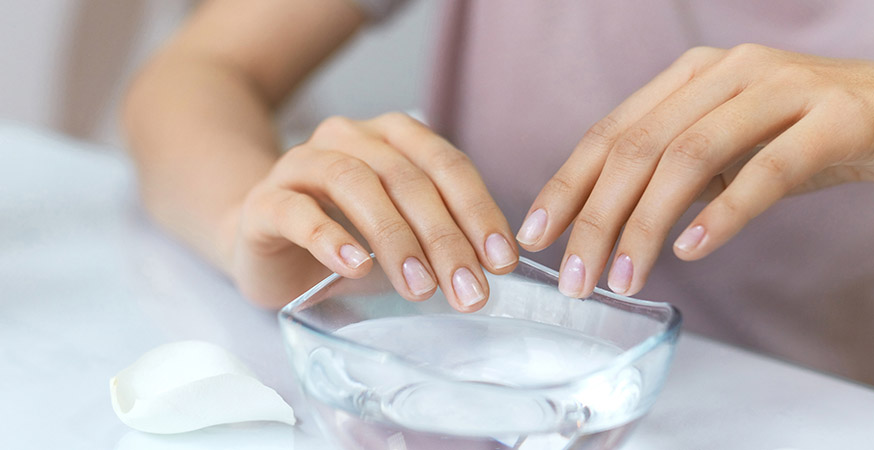
Method 1: The Acetone Soak
The acetone soak is the most widely recommended and effective method for removing acrylic nails. Acetone is a solvent that breaks down the acrylic, allowing it to be gently removed.
What You’ll Need:
- 100% pure acetone
- Cotton balls
- Aluminum foil
- A small bowl
- A nail file
- Cuticle pusher or orange wood stick
- Petroleum jelly (optional)
- Nail buffer
- Moisturizing nail oil or cream
Step-by-Step Instructions:
- Prep Your Nails: Use a nail file to file down the top layer of the acrylic. This helps the acetone penetrate more effectively. Focus on thinning out the acrylic as much as possible without damaging your natural nail.
- Protect Your Skin: Apply petroleum jelly around your cuticles and the skin surrounding your nails. This will help protect your skin from the drying effects of acetone.
- Soak Cotton Balls: Soak cotton balls in acetone until they are fully saturated.
- Apply to Nails: Place a soaked cotton ball directly onto each nail.
- Wrap in Foil: Wrap each fingertip tightly with aluminum foil to hold the cotton ball in place and prevent the acetone from evaporating quickly.
- Wait Patiently: Allow the acetone to soak for 20-30 minutes. The time may vary depending on the thickness of the acrylic.
- Check for Softening: After 20 minutes, check one nail. If the acrylic is soft and lifting, proceed. If not, re-wrap and soak for another 5-10 minutes.
- Gently Remove Acrylic: Use a cuticle pusher or orange wood stick to gently push the softened acrylic off your nails. Work slowly and carefully to avoid damaging your natural nail.
- Buff and Moisturize: Once all the acrylic is removed, buff your nails to smooth out any rough edges. Apply a moisturizing nail oil or cream to rehydrate your nails and cuticles.
Method 2: The Warm Water Soak (with Acetone)
This method combines the effectiveness of acetone with the gentle warmth of water to expedite the removal process. It’s a slightly less harsh alternative to the full acetone soak.
What You’ll Need:
- 100% pure acetone
- A small bowl
- A larger bowl filled with warm water
- Nail file
- Cuticle pusher or orange wood stick
- Petroleum jelly (optional)
- Nail buffer
- Moisturizing nail oil or cream
Step-by-Step Instructions:
- File Down the Acrylic: As with the previous method, file down the top layer of the acrylic to thin it out.
- Protect Your Skin: Apply petroleum jelly around your cuticles.
- Pour Acetone: Pour acetone into the smaller bowl.
- Place Bowl in Warm Water: Place the smaller bowl of acetone inside the larger bowl of warm water. This creates a gentle heating effect that can speed up the dissolving process. Ensure the water doesn’t get into the acetone.
- Soak Your Nails: Soak your nails in the acetone for 15-20 minutes, checking periodically to see if the acrylic is softening.
- Gently Remove: Use a cuticle pusher or orange wood stick to gently push off the softened acrylic.
- Buff and Moisturize: Buff your nails and apply moisturizing oil or cream.
Method 3: Using a Nail Drill
A nail drill can significantly speed up the removal process, but it requires careful handling to avoid damaging the natural nail. If you’re not comfortable using a drill, it’s best to stick to the soaking methods.
What You’ll Need:
- Nail drill with appropriate drill bits (safety bit recommended)
- Nail file
- Cuticle pusher or orange wood stick
- Acetone (optional, for final removal of any remaining acrylic)
- Nail buffer
- Moisturizing nail oil or cream
Step-by-Step Instructions:
- File Down the Acrylic: Use the nail drill with a safety bit to carefully file down the bulk of the acrylic. Work in slow, controlled motions, and avoid applying too much pressure.
- Switch to Hand Filing: Once you’ve thinned the acrylic significantly, switch to a hand file to refine the shape and remove any remaining acrylic close to the natural nail.
- Soak (Optional): If there are stubborn bits of acrylic remaining, soak your nails in acetone for a short period (5-10 minutes) to soften them further.
- Gently Remove: Use a cuticle pusher or orange wood stick to gently remove any remaining softened acrylic.
- Buff and Moisturize: Buff your nails and apply moisturizing oil or cream.
Method 4: The Floss Method (Not Recommended)
The floss method involves using dental floss to pry the acrylic nail away from the natural nail. While some sources suggest this method, it is generally not recommended due to the high risk of causing significant damage to the natural nail. It can lead to tearing and thinning of the nail plate, resulting in pain and potential infection.
If you attempt this method, proceed with extreme caution and understand the potential risks.
What You’ll Need:
- Dental floss
- Cuticle pusher
Step-by-Step Instructions (Use with Caution):
- Loosen the Acrylic: Use a cuticle pusher to gently lift the edges of the acrylic nail.
- Thread the Floss: Carefully thread the dental floss underneath the lifted edge of the acrylic.
- Saw Back and Forth: Using a sawing motion, gently work the floss back and forth along the length of the acrylic nail to separate it from the natural nail.
- Proceed Slowly: If you encounter resistance, stop immediately. Forcing the floss can cause damage.
- Moisturize: After (hopefully) successful removal, moisturize your nails and cuticles.
Again, this method is not recommended due to the high risk of damage.
Post-Removal Nail Care
After removing your acrylic nails, it’s essential to focus on restoring the health and strength of your natural nails. Here are some tips for post-removal nail care:
- Moisturize Regularly: Apply a moisturizing nail oil or cream several times a day to rehydrate your nails and cuticles. Look for products containing ingredients like vitamin E, jojoba oil, or shea butter.
- Use a Nail Strengthener: Apply a nail strengthener or hardener to help rebuild the nail’s structure and prevent breakage.
- Avoid Harsh Chemicals: Limit your exposure to harsh chemicals, such as cleaning products, which can further dry out and damage your nails. Wear gloves when doing household chores.
- Maintain a Healthy Diet: A balanced diet rich in vitamins and minerals, particularly biotin, can promote healthy nail growth.
- Give Your Nails a Break: Allow your nails to breathe and recover before applying another set of acrylics or other artificial enhancements. Consider taking a break for a few weeks or months.
Common Mistakes to Avoid When Removing Acrylic Nails
To ensure a safe and effective removal process, avoid these common mistakes:
- Picking or Peeling: Never pick or peel off acrylic nails, as this can cause significant damage to your natural nails.
- Using Force: Avoid using excessive force when removing the acrylic. If you encounter resistance, soak your nails for a longer period.
- Ignoring Skin Protection: Always protect your skin with petroleum jelly or a similar barrier cream to prevent irritation and dryness from acetone exposure.
- Skipping Post-Removal Care: Don’t neglect post-removal nail care. Moisturizing and strengthening your nails are crucial for restoring their health.
- Using Unsafe Methods: Avoid using potentially harmful methods like the floss method if you are not extremely careful, or other methods that involve prying or forcing the acrylic off.
When to Seek Professional Help
While ways to take off acrylic nails at home are readily available, there are times when it’s best to seek professional help. If you experience any of the following, consult a nail technician or dermatologist:
- Signs of infection, such as redness, swelling, or pus.
- Severe pain or discomfort.
- Significant damage to your natural nails.
- Difficulty removing the acrylic nails despite following the correct procedures.
Conclusion
Removing acrylic nails at home is achievable with the right tools, techniques, and patience. The acetone soak method is the most reliable and recommended approach. Remember to prioritize the health of your natural nails by following safe removal practices and providing proper post-removal care. By avoiding common mistakes and knowing when to seek professional help, you can maintain beautiful and healthy nails. Knowing the proper ways to take off acrylic nails at home can save time and money, while ensuring your nails remain in good condition. Always prioritize gentle and careful methods to avoid damage. Taking the time to properly take off acrylic nails at home will pay off in the long run with healthier, stronger natural nails. So, next time you need to take off acrylic nails at home, remember these tips and enjoy the process!
[See also: How to Choose the Right Nail Shape for Your Hands]
[See also: The Ultimate Guide to Nail Polish Colors for Every Season]
[See also: DIY Manicure Tips for a Salon-Quality Finish at Home]
