
Connecting Buffer Tube and Stock: A Comprehensive Guide
The buffer tube and stock are critical components of AR-15 style rifles, impacting both functionality and ergonomics. Understanding how to properly connect the buffer tube and stock is essential for any gun owner or enthusiast. This comprehensive guide will walk you through the process, covering different types of stocks, buffer tube compatibility, and best practices for a secure and reliable connection. Whether you’re building a new rifle, upgrading your existing setup, or simply need to replace a worn-out part, this guide provides the information you need to successfully connect buffer tube and stock.
Understanding the Buffer Tube and Stock System
Before diving into the connection process, it’s crucial to understand the roles of the buffer tube and stock. The buffer tube, also known as the receiver extension, houses the buffer and buffer spring. These components are vital for absorbing recoil and ensuring reliable cycling of the bolt carrier group. The stock, on the other hand, provides a point of contact for the shooter’s shoulder, contributing to stability and accuracy.
Types of Buffer Tubes
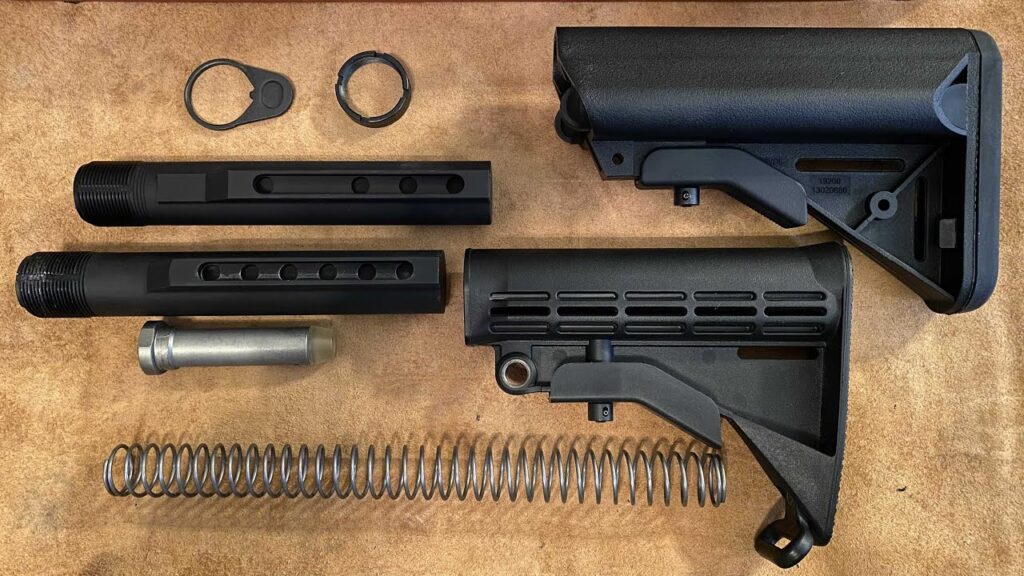
There are primarily two types of buffer tubes:
- Mil-Spec: Designed to meet military specifications, mil-spec buffer tubes are slightly narrower in diameter than commercial tubes. They are known for their durability and are a common choice for AR-15 builds.
- Commercial: Commercial buffer tubes are slightly wider than mil-spec tubes. While they may be less expensive, they might not be as durable as their mil-spec counterparts.
It’s important to note that stocks designed for mil-spec buffer tubes are generally not compatible with commercial buffer tubes, and vice versa. Ensure you select a stock that matches the type of buffer tube you have.
Types of Stocks
Stocks come in various styles, including:
- Adjustable Stocks: These stocks allow the shooter to adjust the length of pull, making them versatile for different body types and shooting preferences.
- Fixed Stocks: Fixed stocks offer a consistent length of pull and are often preferred for their simplicity and durability.
- Collapsible Stocks: Similar to adjustable stocks, collapsible stocks can be adjusted for length of pull and easily collapse for storage or transport.
Tools Needed for Connecting Buffer Tube and Stock
Before you begin, gather the following tools:
- AR-15 Armorer’s Wrench: This wrench is specifically designed for working on AR-15 rifles, including tightening and loosening the castle nut.
- Buffer Tube Wrench (Optional): Some buffer tubes may require a specialized wrench for installation.
- Torque Wrench: To ensure proper tightening of the castle nut without over-tightening.
- Vise and Upper Receiver Vise Block: To securely hold the upper receiver during installation.
- Punch Set: For removing pins, if necessary.
- Hammer: For gently tapping pins into place.
- Gun Oil or Grease: For lubricating threads and moving parts.
Step-by-Step Guide: Connecting Buffer Tube and Stock
Follow these steps to properly connect buffer tube and stock:
Step 1: Disassembly (If Necessary)
If you are replacing an existing buffer tube and stock, you’ll need to disassemble the old components. Use the AR-15 armorer’s wrench to loosen the castle nut, which secures the buffer tube to the lower receiver. Once the castle nut is loose, you can unscrew the buffer tube and remove the buffer and buffer spring.
Step 2: Installing the Buffer Tube
Apply a small amount of gun oil or grease to the threads of the buffer tube. Carefully screw the buffer tube into the lower receiver, ensuring that it aligns properly with the receiver. The buffer retainer pin should be able to move freely without obstruction. Tighten the buffer tube to the manufacturer’s recommended torque specification. This is a crucial step for connecting buffer tube and stock properly.
Step 3: Installing the Buffer Retainer and Spring
Insert the buffer retainer and spring into their respective holes in the lower receiver. The buffer retainer should protrude slightly above the surface of the receiver.
Step 4: Securing the Castle Nut
Slide the castle nut over the buffer tube and thread it onto the lower receiver. Use the AR-15 armorer’s wrench to tighten the castle nut. Ensure that the castle nut engages with the buffer tube’s notches to prevent it from loosening during use. Torque the castle nut to the manufacturer’s recommended specification using a torque wrench. Proper torque is essential when connecting buffer tube and stock.
Step 5: Installing the Stock
Slide the stock onto the buffer tube. For adjustable stocks, ensure that the adjustment lever or button is properly engaged. For fixed stocks, ensure that the stock is securely attached to the buffer tube. Once the stock is installed, check that it moves freely and locks into place correctly.
Step 6: Function Check
After connecting buffer tube and stock, perform a function check to ensure that the rifle operates correctly. Cycle the bolt carrier group to verify that it moves smoothly and that the buffer and buffer spring are functioning properly. Also, check that the stock is securely attached and does not wobble or move excessively.
Troubleshooting Common Issues
Here are some common issues you might encounter when connecting buffer tube and stock, and how to resolve them:
- Castle Nut Loosening: If the castle nut repeatedly loosens, consider using a thread locker, such as Loctite, to secure it in place.
- Stock Wobbling: If the stock wobbles excessively, ensure that it is properly seated on the buffer tube and that the adjustment lever or button is fully engaged. If the wobble persists, consider using a shim or spacer to tighten the fit.
- Buffer Retainer Pin Binding: If the buffer retainer pin binds, ensure that the buffer tube is properly aligned with the lower receiver and that the buffer retainer is not obstructed.
- Difficulty Cycling: If you experience difficulty cycling the bolt carrier group, check that the buffer and buffer spring are the correct weight and length for your rifle.
Choosing the Right Buffer Tube and Stock
Selecting the right buffer tube and stock is crucial for optimizing the performance and ergonomics of your AR-15. Consider the following factors when making your selection:
- Intended Use: Determine how you will primarily use your rifle. For example, if you plan to use it for competition shooting, you may prefer an adjustable stock that allows you to fine-tune the length of pull.
- Budget: Buffer tubes and stocks are available at a wide range of price points. Set a budget and choose components that offer the best value for your money.
- Compatibility: Ensure that the buffer tube and stock are compatible with each other and with your rifle.
- Material and Construction: Look for components that are made from durable materials and are well-constructed.
- Reviews and Recommendations: Read reviews and seek recommendations from other gun owners and enthusiasts.
Maintenance and Care
Proper maintenance and care are essential for ensuring the longevity and reliability of your buffer tube and stock. Regularly clean and lubricate the buffer tube to prevent corrosion and ensure smooth operation. Inspect the stock for signs of wear or damage, and replace it if necessary. Following these simple maintenance tips will help you keep your rifle in top condition.
The Importance of Proper Installation
Proper installation of the buffer tube and stock is paramount for safe and reliable operation of your firearm. Incorrect installation can lead to malfunctions, damage to the rifle, and even injury. If you are not comfortable performing the installation yourself, it is best to seek the assistance of a qualified gunsmith. Always prioritize safety and follow all applicable laws and regulations when working on firearms. Properly connecting buffer tube and stock is a vital part of firearm maintenance.
Enhancing Your Shooting Experience
Beyond the technical aspects, the right buffer tube and stock can significantly enhance your shooting experience. An adjustable stock allows you to customize the length of pull to fit your body type and shooting style, improving comfort and accuracy. A well-designed stock can also help to absorb recoil, reducing fatigue and allowing you to stay on target for longer periods of time. Investing in quality components and taking the time to properly install them can make a noticeable difference in your shooting performance.
In conclusion, understanding how to properly connect buffer tube and stock is a fundamental skill for any AR-15 owner. By following the steps outlined in this guide, you can ensure a secure and reliable connection that enhances the performance and ergonomics of your rifle. Remember to prioritize safety, use the correct tools, and follow the manufacturer’s instructions. With a little knowledge and effort, you can confidently connect buffer tube and stock and enjoy a more rewarding shooting experience. This guide provides the necessary information for anyone looking to connect buffer tube and stock effectively.
[See also: AR-15 Buffer Tube Types and Compatibility] [See also: Choosing the Right AR-15 Stock for Your Needs] [See also: AR-15 Maintenance and Cleaning Guide]
