How to Remove a Broken Screw with No Head: A Comprehensive Guide
Dealing with a broken screw, especially one where the head has snapped off, can be incredibly frustrating. Whether you’re working on a DIY project, repairing furniture, or tackling a more complex mechanical issue, a stripped or headless screw can bring everything to a standstill. This comprehensive guide provides several proven methods on how to remove a broken screw with no head, minimizing further damage and getting you back on track.
Before we dive into the techniques, it’s crucial to understand why screws break in the first place. Over-tightening, using the wrong type of screwdriver, corrosion, and material fatigue are common culprits. Recognizing these factors can help you prevent future mishaps. Now, let’s explore various methods to effectively remove that pesky broken screw with no head.
Understanding the Problem: Why Screws Break
Before attempting any removal method, it’s essential to understand the underlying causes of screw breakage. This knowledge can not only help you avoid similar situations in the future but also inform your approach to the current problem. Common reasons for screws breaking include:
- Over-tightening: Applying excessive force when tightening a screw can exceed its tensile strength, leading to snapping or stripping.
- Incorrect Screwdriver: Using a screwdriver that doesn’t properly fit the screw head can cause slippage and damage, increasing the likelihood of breakage.
- Corrosion: Rust and corrosion weaken the screw’s structure over time, making it more vulnerable to breaking, especially when force is applied.
- Material Fatigue: Repeated stress and strain on the screw, particularly in applications involving vibration or movement, can lead to metal fatigue and eventual failure.
- Low-Quality Screws: Inferior screws made from weak materials are more prone to breaking under normal use.
Essential Tools for Removing Broken Screws
Having the right tools on hand can significantly improve your chances of successfully removing a broken screw with no head. Here’s a list of essential tools you might need:
- Screw Extractors: These specialized tools are designed to grip the screw and back it out.
- Left-Handed Drill Bits: These bits can sometimes catch and unscrew the screw as you drill.
- Drill: A power drill is necessary for using screw extractors and left-handed drill bits.
- Pliers: Needle-nose or locking pliers can be useful for gripping and turning protruding screw shafts.
- Screwdrivers: A variety of screwdrivers (flathead, Phillips, etc.) might be needed for initial assessment and preparation.
- Center Punch: Used to create a starting point for drilling, preventing the drill bit from wandering.
- Hammer: For gently tapping the center punch.
- Penetrating Oil: Helps to loosen corroded screws.
- Heat Gun or Soldering Iron: Can be used to apply heat and help loosen stubborn screws.
Methods for Removing a Broken Screw with No Head
Now, let’s delve into the various techniques you can use to remove a broken screw with no head. Remember to proceed with caution and patience to avoid further damage to the surrounding material.
Using a Screw Extractor
Screw extractors are specifically designed for removing damaged screws. Here’s how to use them effectively:
- Prepare the Screw: Use a center punch to create a small indentation in the center of the broken screw. This will help guide the drill bit.
- Drill a Pilot Hole: Select a drill bit that is slightly smaller than the screw extractor. Drill a pilot hole into the center of the broken screw. Be careful not to drill too deep.
- Insert the Screw Extractor: Insert the screw extractor into the pilot hole.
- Turn Counterclockwise: Using a tap wrench or a drill on a low setting, turn the screw extractor counterclockwise. Apply steady pressure. The extractor should bite into the screw and begin to unscrew it.
- Remove the Screw: Continue turning until the broken screw is completely removed.
The Rubber Band Trick
This method is best suited for screws that are not tightly stuck. Place a wide rubber band over the broken screw and then insert your screwdriver. The rubber band can fill the gap and provide extra grip.
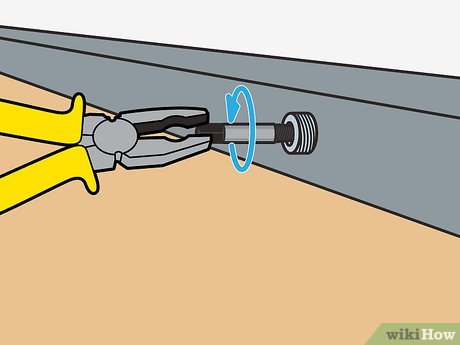
Using Pliers or Vise-Grips
If a portion of the screw is still protruding, you might be able to grip it with pliers or vise-grips. Lock the pliers onto the screw and gently turn it counterclockwise.
Creating a New Slot with a Dremel
Using a Dremel tool with a cutting wheel, carefully create a slot on the top of the broken screw. Then, use a flathead screwdriver to turn the screw counterclockwise.
Applying Heat
Heat can help to loosen corroded screws. Use a heat gun or soldering iron to apply heat to the screw for a few minutes. Be careful not to overheat the surrounding material.
Using Penetrating Oil
Apply penetrating oil to the broken screw and let it soak for several hours or overnight. This can help to loosen the screw and make it easier to remove. [See also: Best Penetrating Oils for Removing Screws]
Left-Handed Drill Bits
Left-handed drill bits are designed to catch and unscrew the screw as you drill. Select a drill bit that is slightly smaller than the screw. Drill into the center of the broken screw. As you drill, the bit may catch and begin to unscrew the screw.
Welding a Nut to the Broken Screw
If you have access to a welder, you can weld a nut to the top of the broken screw. The heat from the welding process can help to loosen the screw, and the nut will provide a grip for turning it. This method is generally for more advanced users and requires proper safety precautions.
Preventing Future Screw Breakage
Once you’ve successfully removed the broken screw with no head, take steps to prevent future occurrences:
- Use the Right Tools: Always use the correct screwdriver size and type for the screw.
- Avoid Over-Tightening: Tighten screws until they are snug, but avoid applying excessive force.
- Apply Lubrication: Use a lubricant on screws that are prone to corrosion.
- Choose Quality Screws: Opt for screws made from high-quality materials.
- Pre-Drill Pilot Holes: When working with wood or other soft materials, pre-drilling pilot holes can prevent screws from breaking.
Troubleshooting Common Issues
Even with the best techniques, you might encounter some challenges when removing a broken screw with no head. Here are some common issues and how to address them:
- Screw Extractor Breaks: If the screw extractor breaks inside the screw, it can be even more challenging to remove. Try using a smaller extractor or consider using a different method altogether.
- Drill Bit Wanders: If the drill bit keeps slipping off the center of the screw, use a center punch to create a deeper indentation.
- Screw is Severely Corroded: Apply penetrating oil and heat to help loosen the corrosion. You may need to repeat this process several times.
- Surrounding Material is Damaged: If you accidentally damage the surrounding material, you may need to repair it with wood filler or other appropriate materials.
Conclusion
Removing a broken screw with no head can be a challenging task, but with the right tools and techniques, it is definitely achievable. By understanding the causes of screw breakage and taking preventative measures, you can minimize the risk of future problems. Remember to be patient, proceed with caution, and don’t hesitate to try different methods until you find one that works. Good luck!
Hopefully, this comprehensive guide has provided you with the knowledge and confidence to tackle this common DIY dilemma. Remember safety first, and always wear appropriate safety gear when using power tools. Now go forth and conquer those broken screws!
Knowing how to remove a broken screw with no head is a valuable skill for any homeowner, DIY enthusiast, or professional tradesperson. By following these steps and taking the necessary precautions, you can save time, money, and frustration.
Mastering the art of how to remove a broken screw with no head involves a combination of technique, patience, and the right tools. Keep practicing, and you’ll become a pro at extracting even the most stubborn screws.
