
CVS Acrylic Nail Kit: A Comprehensive Guide to At-Home Acrylic Nails
Achieving salon-quality nails at home has never been easier, thanks to the availability of CVS acrylic nail kits. These kits provide a convenient and affordable alternative to professional manicures, allowing you to create beautiful and durable acrylic nails in the comfort of your own space. This comprehensive guide will delve into everything you need to know about CVS acrylic nail kits, from understanding the components to mastering the application process.
What is a CVS Acrylic Nail Kit?
A CVS acrylic nail kit is a collection of products designed to enable you to create artificial nails using acrylic powder and liquid monomer. These kits typically include the essential tools and materials needed for the application, making it a convenient option for beginners and experienced nail enthusiasts alike.
Components of a Typical CVS Acrylic Nail Kit
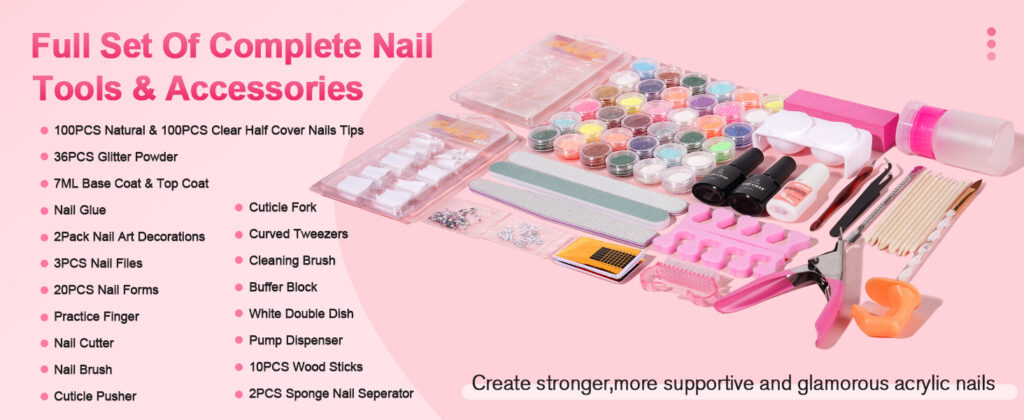
While the specific contents may vary slightly between different brands and kits, most CVS acrylic nail kits will include the following:
- Acrylic Powder: This is the base material for creating the artificial nail. It comes in various colors, including clear, pink, and white.
- Monomer Liquid: This liquid is mixed with the acrylic powder to create a workable paste that hardens over time.
- Acrylic Nail Brush: A specialized brush designed for picking up and applying the acrylic mixture.
- Nail Forms or Tips: These are used to extend the length of your natural nails. Forms are applied underneath the natural nail, while tips are glued on.
- Nail Glue: Used to adhere the nail tips to your natural nails.
- Primer: Applied to the natural nail to improve adhesion of the acrylic.
- Top Coat: Provides a glossy finish and protects the acrylic nails.
- Cuticle Pusher: Used to gently push back the cuticles before application.
- Nail File and Buffer: For shaping and smoothing the acrylic nails.
- Instructions: A step-by-step guide on how to apply the acrylic nails.
Benefits of Using a CVS Acrylic Nail Kit
There are several advantages to using a CVS acrylic nail kit for your at-home manicures:
- Cost-Effective: Acrylic nail kits are significantly cheaper than salon visits.
- Convenience: You can do your nails whenever you have the time, without needing to schedule an appointment.
- Customization: You have complete control over the length, shape, and color of your nails.
- Long-Lasting: Acrylic nails are known for their durability and can last for several weeks with proper care.
Choosing the Right CVS Acrylic Nail Kit
With various options available at CVS, selecting the right CVS acrylic nail kit can seem daunting. Consider the following factors:
- Skill Level: If you’re a beginner, opt for a kit that includes detailed instructions and all the necessary tools.
- Desired Nail Length: Choose a kit with nail forms or tips that match your desired nail length.
- Color Preference: Select a kit with acrylic powder in your preferred color or a clear powder that you can paint over.
- Brand Reputation: Research different brands and read reviews to ensure you’re choosing a high-quality kit.
Step-by-Step Guide to Applying Acrylic Nails with a CVS Kit
Follow these steps for a successful at-home acrylic nail application using a CVS acrylic nail kit:
Preparation
- Gather all the necessary materials from your CVS acrylic nail kit.
- Clean and dry your hands thoroughly.
- Gently push back your cuticles with the cuticle pusher.
- Lightly buff the surface of your natural nails to remove shine.
Applying Nail Tips or Forms
- If using nail tips, apply a small amount of nail glue to the tip and adhere it to your natural nail. Hold it in place for a few seconds until the glue dries.
- If using nail forms, carefully attach them underneath your natural nail, ensuring a snug fit.
- Trim and shape the nail tips or forms to your desired length and shape.
Acrylic Application
- Apply primer to your natural nails and the surface of the nail tips or forms.
- Pour a small amount of monomer liquid into a dappen dish.
- Dip your acrylic nail brush into the monomer liquid, then dip it into the acrylic powder.
- Create a small bead of acrylic on the brush.
- Apply the acrylic bead to your nail, starting at the cuticle area and working your way down to the tip.
- Repeat steps 3-5 until you have a smooth and even layer of acrylic covering the entire nail.
- Allow the acrylic to dry completely.
Shaping and Finishing
- Use a nail file to shape the acrylic nails to your desired shape.
- Use a nail buffer to smooth the surface of the acrylic nails.
- Apply a top coat to protect the acrylic and add shine.
- Allow the top coat to dry completely.
Tips for a Successful Acrylic Nail Application
Here are some helpful tips to ensure a smooth and successful acrylic nail application with your CVS acrylic nail kit:
- Work in a well-ventilated area: The monomer liquid has a strong odor, so it’s important to work in a well-ventilated space.
- Practice makes perfect: Don’t be discouraged if your first attempt isn’t perfect. With practice, you’ll improve your technique.
- Use the right amount of monomer: Too much monomer will make the acrylic runny, while too little will make it dry and difficult to work with.
- Clean your brush regularly: Clean your acrylic nail brush with monomer liquid after each application to prevent it from hardening.
- Be patient: Allow the acrylic to dry completely before filing and shaping.
Maintaining Your Acrylic Nails
To keep your acrylic nails looking their best, follow these maintenance tips:
- Apply cuticle oil daily: This will help keep your cuticles hydrated and prevent them from drying out.
- Wear gloves when doing household chores: This will protect your acrylic nails from harsh chemicals and water.
- Avoid using your nails as tools: This can cause them to break or chip.
- Get regular fills: As your natural nails grow, you’ll need to get fills to maintain the appearance of your acrylic nails.
Potential Problems and Solutions
Even with careful application, you may encounter some problems when using a CVS acrylic nail kit. Here are some common issues and their solutions:
- Acrylic lifting: This can be caused by improper preparation or applying the acrylic too close to the cuticle. To prevent lifting, make sure to properly prep your nails and avoid applying the acrylic directly to the cuticle.
- Bubbles in the acrylic: This can be caused by using too much monomer or not mixing the acrylic properly. To prevent bubbles, use the correct ratio of monomer to powder and mix the acrylic thoroughly.
- Brittle acrylic: This can be caused by using old or low-quality acrylic powder. To prevent brittle acrylic, use fresh, high-quality acrylic powder.
Where to Buy CVS Acrylic Nail Kits
CVS acrylic nail kits are readily available at most CVS Pharmacy locations and online through the CVS website. You can also find them at other drugstores and beauty supply stores. [See also: Best At-Home Nail Kits].
Alternatives to CVS Acrylic Nail Kits
While CVS acrylic nail kits offer a convenient solution, several alternatives exist for achieving beautiful artificial nails:
- Gel Nail Kits: Gel nails offer a similar look to acrylics but are cured under a UV or LED lamp.
- Dip Powder Kits: Dip powder nails are applied by dipping your nails into colored powder, creating a durable and long-lasting finish.
- Press-On Nails: Press-on nails are a quick and easy option for a temporary manicure.
Conclusion
CVS acrylic nail kits provide a convenient and affordable way to achieve salon-quality nails at home. By understanding the components of the kit, following the application steps carefully, and maintaining your nails properly, you can enjoy beautiful and durable acrylic nails for weeks to come. Remember to prioritize proper preparation and technique for optimal results. With practice, you’ll be able to create stunning manicures using your CVS acrylic nail kit. Consider also alternatives like gel or dip powder kits if acrylics aren’t your preference. Always ensure you are using quality products for the best and safest results with your at-home manicure using a CVS acrylic nail kit.
